Blue on Black

This was my first build. It was a kit from thefretwire.com that my daughter got me for Christmas. The pickups, bridge, knobs and tuners that came with the kit would not go well with the finish that I chose so I ordered what I wanted off of Amazon. I can’t speak to the quality of the components that I didn’t use but the rest was perfect. The neck and body were a tight fit and the scale length was spot on. The cavities cut out for the pickups and the holes bored for the bridge and knobs were cleanly cut. The neck was straight and the fret work was fine. The fret ends were a bit rough but nothing that a little filing couldn’t fix. For the price point, it’s a fantastic value. I’ve posted links below to the kit and components that I used.
thefretwire.com makes great kits but there are no usable instructions for finishing and assembly. It included a wiring diagram (which I can’t read) and a very vague list of steps to follow. There are a lot of resources online, like this one, that will give you the information you need to get it done right.
This process starts with a lot of sanding. I started with a 220 grit and worked up to a 600 grit. I used an ebony stain dye on the face of the body and eventually the back and neck. It wipes on and off with a clean soft cloth. It is extremely easy to use and clean up. After drying, I sanded the face so that the only dye remaining was in the grain pattern. This is tricky because the flame maple top is a veneer. There were a couple of spots around the edges where I sanded through the veneer. It felt like a disaster at the time but you have to look closely to see them now.
After sanding so that the dye only remained in the grain pattern, I applied a blue dye stain. Again, easy to apply and clean up. I applied two coats to get a deeper blue color. I did another light sanding and then prepped the wood for the lacquer coats by wiping it down with mineral spirits to remove the dust.
I tried to create a paint room in a corner of my basement. This was a mistake because there was no ventilation. The garage would be fine for spraying as long as long as it is dust free. You can also spray in your yard, weather permitting. The basement was a bad idea. I put a total of 12 coats of lacquer it. It’s done 3 coats at a time with no more than 2 coats in a single day. After 3 coats, I scuffed the surface with #0000 steel wool then 3 more coats. This works but it doesn’t produce the glassy smooth finish that I was hoping for. It still shines and looks great but it’s not a mirror finish. The mirror finish requires wet sanding between coats and polishing with a rubbing compound after all the lacquer dries.
This has a set neck so after finishing, the neck can be glued in place and carefully clamped so that it doesn’t damage the frets or finish. The tuning pegs and bridge assembly are simple enough to install. The wiring is where it gets frustrating as I do not know how to decipher a wiring diagram. I found a couple of different resources online that I was able to combine to figure it out.
All of the soldering needs to be done outside of the guitar. Then the wired pots and switch need to be dropped through the “f-holes” and fished up through the holes where they belong. I used a cable with a rubber band tied to one end it to pull the components through the holes where they belong. It worked but was tedious and frustrating. Recently I saw a video from a YouTuber, Dan from Guns and Guitars, that showed how to use plastic tubing to pull the pots through. It’s a brilliant idea. I’ll include the link below. Dan’s a smart resourceful guy that posts a lot of helpful information in his videos.
After getting it all together, I plugged it in and it actually played. Having done this for the first time, I was thrilled that it didn’t burst into flames when connected to an amp. It actually sounded pretty good. One of the pickups was not responding when I turned the tone knob so I took it to a guitar repair guy close to my home. He repaired my wiring issue and did a full set up for me. It plays and sounds great. I’ll get some music samples from it and post a video of the entire process when I have them ready. Please feel free to send me a note with any questions or comments about this.
Links: Guitar Kit, Pickups, Bridge, Knobs, Wiring Video,
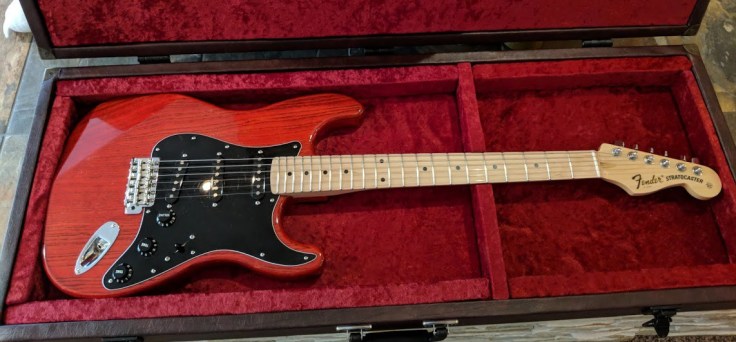
El Corazón
 I built this for my 30-year-old son who started learning guitar from his step father when he was five. He has a natural gift for music and a passion for stringed instruments. I wanted to build him something he would be proud to play.
I ordered the swamp ash body and maple on maple neck from precisionguitarkits.com. It’s a two piece body but the seam is only noticeable when looking at the end grain. The neck pocket and other cavities have nice clean cuts without any chipping around the edges. The neck was a tight fit. The fret work on this is fantastic. The fret ends had been cleaned up nicely and have a soft feel. There were a few frets that needed minor leveling but honestly it would have been good the way it came.
I did a lot of research to find a finish that would produce the look that I wanted. I combined insight from multiple sources to determine the exact steps and products that I would use. The core process that I used requires patients and some faith that it’s going to come out the way you want it to. It also requires following the steps closely, especially during the sealing and pore filling process. Following are the variations that I used to the process in the link:
- During the sanding process, I incrementally worked up to a 600 grit sand paper. It softens the feel of the wood a bit more than 220. I used denatured alcohol instead of water to raise the grain. The denatured alcohol dries significantly faster than water so you can get back to sanding quicker.
- I used a brush on seal coat instead of a spray. The gentleman at the Woodcraft store recommended diluting with alcohol before application. I didn’t do that and it went on thick with some drips. A diluted seal will probably penetrate the wood more evenly and drip less. I would recommend doing this.
- I used an ebony tinted wood filler and diluted with water to thin instead of tinting a pore filler. The diluted wood filler worked fine as a pore filler. The mistake that I made was waiting for it to dry completely before scraping. Big mistake. The dried pore filler cannot be scraped at that point. It has to be sanded. Lots of additional sanding.
- I used a spray lacquer instead of the wipe on poly coat that he used. The lacquer process takes several weeks of spraying, drying and wet sanding multiple coats to get a fine glossy finish. This is a personal preference. I wanted it to look and feel as much like an American made Fender as possible which meant lacquer.
The lacquer process I used came from a book I downloaded on my Kindle called, How to Build Electric Guitars: The Complete Guide to Building and Setting Up Your Own Custom Guitar by Will Kelly. The process he uses is for a sunburst finish but there is a lot of good information about the clear lacquer process. I combined his techniques with the process I found online. He has built a lot of guitars for an impressive list of artists but he reduces the process to something an amature can execute with a modest collection of tools. He also walks you through the set up process. The set up for a strat is relatively simple and I was able to do this myself with good results.
The wiring is the part of the process that I’m least comfortable with mostly because I can’t read a wiring diagram. However, the pickups came with a nice illustration that anyone can follow. You will need a soldering iron. I purchased a $9.99 soldering iron for my first build not knowing if I would ever need it again. It works fine for all of the connections on the pickguard. The only issue I had was the ground wire to the tremolo spring claw. The cheap soldering iron cannot get the spring claw hot enough to form a good connection. I took it to a guitar repair guy that did the set up on my first build.
I also built a case for this. I got the idea from a YouTuber named Bob at I Like to Build Stuff. Bob is a really smart guy with a lot of easily executable projects. I used his idea and beefed it up a bit to make the case a bit more sturdy. I used my dovetail joiner to make super strong corner joints and rabbeted the top and bottom in. If you don’t know what that means, it’s okay. Bob’s process works great. I also used different fabrics and corner guards but the core of the case is as Bob built it.
When all was said and done, I had a beautiful guitar that was very playable and produced great sounds. My son was thrilled with the gift. I will add some music samples and a link to a video that documents my process when they are ready. Please feel free to send me a note with any questions or comments about this.
Links: Body and neck, Pickups, Pickguard, Tremolo, Tuning knobs, other genuine fender accessories, wiring, finish process, denatured alcohol, stain dye, pore and grain filler, sealant, wet/dry sandpaper, other sanding materials, lacquer, polish, final polish, microfiber cloths, book.
